Virtuoso School Of Music and Art
17232 Lancaster hwy. STE 108 Charlotte NC
School office:
School Director:
Virtuoso School Of Music and Art
17232 Lancaster hwy. STE 108 Charlotte NC
School office:
School Director:
The saxophone is a sophisticated brass instrument that requires consistent, thoughtful care to maintain its rich, resonant sound and mechanical integrity. Whether you play tenor, alto, soprano, or baritone saxophone, the fundamental principles of maintenance remain the same. Developing proper care habits from the beginning protects your investment, ensures reliable performance during rehearsals and performances, and significantly extends your instrument’s lifespan. This comprehensive guide covers everything you need to know about keeping your saxophone in peak condition.
Before implementing a maintenance routine, it’s essential to understand the major components of your saxophone and how they work together. Each part plays a critical role in sound production and instrument function. The mouthpiece is where the magic begins—it’s the first component to interact with your breath and the reed. Your ligature holds the reed securely against the mouthpiece, and both components must work together perfectly for optimal playability.
The neck connects the mouthpiece to the body and contains additional tone holes that adjust the instrument’s intonation and response. The body is the largest and most complex component, housing most of the tone holes and the intricate key system. The bell at the bottom projects the sound and affects the lower register response. Understanding these relationships helps you recognize when something isn’t functioning properly and what part might need attention.
|
Component |
Function |
Moisture Sensitivity |
|
Mouthpiece |
Entry point for air; affects tone quality and embouchure |
Very High |
|
Reed |
Vibrates to produce sound; most critical for playability |
Very High |
|
Ligature |
Holds reed in place; affects seal and response |
Medium |
|
Neck |
Houses upper tone holes; connects mouthpiece to body |
High |
|
Body |
Contains majority of tone holes and key system |
High |
|
Keys & Springs |
Control tone holes; enable extended range |
High |
|
Pads |
Seal tone holes when keys are pressed; critical for air-tightness |
Very High |
|
Bell |
Projects sound; affects lower register |
Medium |
Alto saxophones are the most common type and require standard care practices that apply to all saxophones. Tenor saxophones are larger and slightly more robust, but their keys require equally careful handling and maintenance. Soprano saxophones are smaller and more delicate, with a more complex intonation system that demands extra attention. Baritone saxophones are the largest and heaviest, requiring careful support during cleaning and maintenance to avoid bending the delicate key system under their own weight.
Each type of saxophone, whether made of brass, nickel-silver, or plated materials, requires similar fundamental care. The main difference lies in the frequency of professional maintenance—larger instruments like baritone saxes may need more frequent adjustments due to their increased mechanical complexity and the strain of their heavier weight on the key system.
The most important maintenance happens immediately after you finish playing. When you’ve just finished a practice session or performance, your saxophone contains accumulated moisture from your breath and saliva, which is the primary enemy of your instrument’s longevity. This moisture must be removed before storing your saxophone, as it promotes corrosion, pad deterioration, and mold growth inside the instrument.
Begin by gently separating the neck from the body of your saxophone. Support the body with one hand and the neck with the other, twisting gently in opposite directions. Apply a small amount of cork grease to the cork joint if needed, but avoid over-greasing, as excess grease can transfer to your pads and cause sticking. Never force the connection apart—if it’s stuck, apply a tiny amount of warm air with a hair dryer to gently warm the cork and loosen it.
Once disassembled, immediately insert your cleaning swab through the body of the saxophone. A proper swab should be absorbent but not so heavy that it gets stuck. Pass it through multiple times, rotating slightly to contact all interior surfaces. Pay special attention to the lower portion of the body where moisture tends to accumulate. After swabbing the body, run the swab through the neck in the same manner. This immediate moisture removal is the single most effective thing you can do to preserve your instrument.
Take a soft microfiber cloth and gently wipe the exterior of your saxophone, removing fingerprints, oils, and any visible residue. This prevents buildup that can eventually damage the finish and make keys sticky. Use a separate cloth to carefully wipe your mouthpiece, being gentle around the tip to avoid damaging the opening. Place your reed on a flat surface to dry—never leave it on the mouthpiece or store it while damp, as this warps the reed and creates an uneven playing surface.
Allow all parts of your saxophone to air dry for 10-15 minutes before reassembling. This brief drying period is crucial and shouldn’t be rushed. After disassembling your saxophone for the day, resist the temptation to immediately put everything back together. The moisture needs time to evaporate from all the internal surfaces. If you’re in a humid climate, you may want to extend this drying time to 20-30 minutes.
When reassembling, apply a tiny amount of cork grease to the cork joint—approximately the size of a grain of rice. Too much grease attracts dust and can migrate into the tone holes, affecting pad sealing. Insert the neck carefully and twist gently until it seats properly. The fit should be snug but not require force. Store your saxophone in its protective case immediately after reassembly.
The reed is arguably the most important component of your saxophone setup, yet many players neglect proper reed care. A good reed is responsive, consistent, and produces a beautiful tone. A poor reed—whether due to inferior manufacturing or improper care—makes playing frustrating and sounds thin or harsh no matter how good your technique is. Since reeds are relatively inexpensive compared to the frustration of playing on a bad one, many professionals maintain a rotation of 5-7 good reeds to maximize their lifespan.
Proper reed storage begins immediately after playing. Remove your reed from the mouthpiece before storing your saxophone, never leaving it on overnight. Gently pat the reed dry with a soft cloth—don’t rub vigorously, as this can damage the delicate tip. Place the reed on a flat surface or in a reed holder designed to maintain its shape. A proper reed case should allow air circulation while protecting the reed from physical damage and extreme humidity changes. Store your reed separately from your saxophone case in a location with stable temperature and humidity.
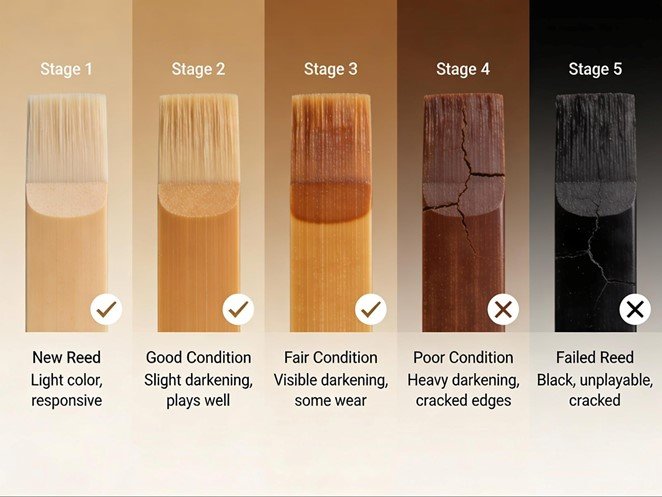
New reeds typically have a light, straw-like color and feel slightly moist to the touch. Good reeds, after 10-20 hours of playing, darken slightly as they acclimate to your specific mouthpiece and playing style. This darkening is normal and desirable. Fair reeds, after 30-50 hours of use, show more pronounced darkening and may begin responding less consistently. At this stage, you should start rotating in a fresher reed, though this one can still be used for practice.
Poor reeds, after 50-80 hours of use, are noticeably dark, may feel spongy or soft, and often fail to respond consistently to your playing demands. These reeds should primarily be reserved for warm-ups or soft practice, as they become unreliable. Failed reeds, which have reached 100+ hours of use or show visible cracks or chipping, should be retired. A failed reed will undermine even excellent technique and is not worth the frustration of attempting to salvage it. Actively maintain a rotation system where you use different reeds on different days to extend the usable life of your collection.
The key indicator for reed replacement is playability combined with appearance. When a reed darkens significantly, starts feeling sluggish in response, or produces an uneven tone across different registers, it’s time to replace it. Many professionals find that they need to replace their primary reed every 3-6 months with regular playing, though casual players may use the same reed for a year or longer. Keep spare reeds in your reed case at all times—traveling without backup reeds is risky since a damaged reed can completely derail a performance.
Once a week, perform a more thorough cleaning that goes beyond the basic post-playing routine. This deeper maintenance requires more time but prevents small problems from becoming expensive repairs. Start by disassembling your saxophone completely—neck, body, and bell should all be separate. If your saxophone has a removable bell, separate it carefully. Some saxophones have the bell permanently attached, in which case just separate the neck and body.
Prepare a small bowl of lukewarm water and add a tiny drop of mild dish soap. Create a slightly soapy solution that’s gentle enough to not damage your saxophone’s interior. Take your cleaning swab and pass it through the body first, allowing the damp cloth to help loosen any stubborn deposits or residue. Follow this with a dry pass to remove excess moisture. Repeat this process several times until the swab comes out clean. Then perform the same process on the neck.
For the mouthpiece, use a specialized mouthpiece brush that fits inside without being too tight. Gently brush the interior surfaces, paying special attention to the table where the reed sits and the facing where you generate your embouchure. Any buildup of saliva and minerals hardens over time and affects how your reed vibrates. Rinse the mouthpiece thoroughly with clean water and dry it completely before storing. Never leave your mouthpiece wet or damp, as the interior finishes can corrode.
Examine your keys carefully during your weekly cleaning, checking that each one moves freely and returns smoothly to its resting position. Using a clean, soft cloth, gently wipe each key carefully to remove accumulated moisture and oils. Focus especially on the spring-loaded keys that get the most use—the pinky keys at the bottom of your left hand side key group tend to have the most mechanical strain and benefit from regular attention.
After visual inspection and cleaning, apply an incredibly small amount of key oil to the pivot points where each key rotates. A single tiny drop is sufficient for each axis. You want the oil to lubricate, not accumulate. Excess oil attracts dust, which then accumulates around your pads and causes them to stick. Work the key up and down a few times to distribute the oil evenly. If you notice any key responding sluggishly or making a squeaking sound as you operate it, this indicates either moisture or old oil buildup—the weekly cleaning with fresh oil application should resolve this.
During weekly maintenance, also inspect your pads by looking down into the tone holes. The pads should appear light in color and feel relatively firm when gently pressed with your finger. If any pad looks discolored, feels spongy, or seems to be lifting away from its seat, make a note for potential professional servicing. Most pads need replacement only every 1-3 years with regular playing, but their condition determines when professional attention becomes necessary. The investment in preventive observation now can catch problems early before they affect your playing.
Monthly maintenance involves a more systematic inspection of your entire saxophone. Set aside time to go through each component methodically, checking for any signs of damage, deterioration, or mechanical problems. Begin with a visual inspection of the exterior. Look for dents, particularly on the body where they’re most common. Minor dents on the bell or body are usually cosmetic, but dents directly over tone holes can affect the instrument’s ability to seal properly and should be professionally assessed.
Examine the key system more closely during this monthly assessment. Close your eyes and press each pad down slowly, feeling for any deviation in how smoothly it closes or how firmly it seats. A pad that closes with a slight delay or doesn’t seat fully indicates either a bent key or a pad that needs replacement. Check that all needle springs are intact and not visibly bent or broken. Even a slightly bent spring can throw off the entire mechanism’s synchronization.
Press down all your low B and C keys, which are among the most complex and most easily thrown out of adjustment. These keys should close in perfect synchronization—you should hear and feel a simultaneous contact rather than a sequential tapping. If these keys feel out of sync, professional regulation is needed. Similarly, check your double G# key to confirm it closes simultaneously with your G key without any lag. These complex key combinations are the most common to require professional adjustment because they involve interconnected mechanisms that can gradually shift with heavy use.
|
Inspection Area |
Monthly Check |
Warning Signs |
|
Pads |
Color and firmness |
Discoloration, sponginess, lifting |
|
Keys |
Smooth operation |
Sluggish movement, squeaking |
|
Springs |
Visual integrity |
Bending, breakage, separation |
|
Mouthpiece |
Interior buildup |
Heavy deposits, discoloration |
|
Cork |
Condition and fit |
Dryness, cracks, loose fit |
|
Body |
External condition |
Dents over tone holes |
|
Reed |
Playability |
Darkening, reduced response |
The saxophone’s greatest enemy is moisture—it promotes corrosion, deteriorates pads, causes stuck keys, and enables mold growth. Your home environment plays a massive role in your saxophone’s longevity. The ideal humidity range for saxophone storage is 40-50% relative humidity, with a stable temperature between 18-22°C (64-72°F). Fluctuations in either temperature or humidity cause materials to expand and contract, stressing the wood and leather components and throwing mechanical adjustments out of synchronization.
If you live in a particularly dry climate, invest in a small humidifier for your storage room. Desert climates with 20-30% humidity will cause cork to become brittle and pads to crack within months. Conversely, tropical climates with 70-80% humidity present different challenges. Excessive moisture promotes corrosion of metal components and mold growth on pads and inside the tone holes. In humid climates, use silica gel desiccant packets in your saxophone case to absorb excess moisture. Replace these packets when they become saturated—usually every 1-2 weeks in very humid conditions.
Winter presents the challenge of rapid temperature fluctuations. When you bring your saxophone indoors from the cold, never open your case immediately. Keep it closed for 30-45 minutes to allow the instrument to gradually warm to room temperature. When an instrument goes from 5°C (-13°F) outdoor air to a 22°C (72°F) warm room, massive condensation forms on all interior surfaces. This condensation is the primary cause of corrosion and pad damage during winter months. Be patient and allow the gradual temperature adaptation to occur inside the closed case.
Summer brings different challenges, primarily excessive heat and humidity. Never leave your saxophone in a vehicle or direct sunlight, as temperatures can exceed 50°C (122°F), causing permanent damage. Metal components can literally warp at these temperatures, and pads can harden permanently. Always keep your case in a cool, shaded location. After playing in summer heat, allow extra drying time—30-45 minutes instead of the usual 15 minutes—before storing your saxophone. The elevated temperature means more moisture evaporates during and immediately after playing, and rushing this process can trap that moisture inside your instrument.
Your saxophone case is its primary defense against physical damage and environmental extremes. A hard protective case provides essential protection for your instrument. Soft gig bags are convenient for transport but don’t provide adequate protection from accidental impacts or environmental fluctuations. If you play frequently and transport your saxophone often, consider investing in a hard case despite its weight and bulk. The protection far outweighs the inconvenience.
Inside your case, ensure that your saxophone is properly secured. It should rest in fitted foam compartments designed specifically for your instrument model. The neck should be stored in its own compartment to prevent it from rolling around and striking other components. Never store your saxophone assembled in its case for extended periods. The constant pressure of the pads against the tone holes causes them to lose their resilience. Instead, disassemble your instrument before storing it. The neck should be stored standing upright or lying flat in its designated space, and the body should be positioned so no keys experience pressure.
Store your reed separately in its own case, not in the main saxophone compartment. Many cases include a small reed compartment or pocket—use this. The reed needs air circulation and should never be exposed to the same temperature fluctuations as your saxophone. Maintain a clean cloth, cork grease, and key oil in your case for immediate access, but keep these away from your pads to prevent accidental contamination. Some players keep a small desiccant packet in their case permanently, replacing it monthly during humid seasons and every 6-8 weeks during dry seasons.
Most saxophones benefit from professional servicing every 1-2 years with regular playing (5+ hours weekly). Casual players who practice less frequently can extend this to every 2-3 years. However, certain components require more regular professional attention. Your pads typically last 1-3 years before needing replacement, depending on playing frequency and how well you maintain moisture management. If you hear air leaking around tone holes even after thorough cleaning, or if certain notes sound stuffy or won’t produce sound clearly, pad replacement is likely needed.
When you take your saxophone for professional service, expect a comprehensive overhaul that includes complete disassembly, cleaning of all components including the interior bore, inspection of all springs and screws, replacement or recovery of any damaged pads, complete regulation to ensure all keys synchronize perfectly, and reassembly with fresh cork grease and key oil. This service typically costs $200-400 depending on your location and the condition of your instrument. This investment pays for itself through restored playability and extended instrument life.
|
Service |
Frequency |
Cost |
What's Included |
|
Light cleaning & adjustment |
Every 6-12 months |
$75-150 |
Deep clean, spring check, minor adjustments |
|
Pad replacement |
Every 1-3 years |
$150-300 |
Remove and replace worn pads, regulation |
|
Complete overhaul |
Every 3-5 years |
$300-500 |
Full disassembly, all parts cleaned/replaced as needed |
|
Spring repair/replacement |
As needed |
$50-150 |
Replace broken or weak springs, regulate mechanism |
|
Cork replacement |
Every 5-10 years |
$50-100 |
Remove old cork, install new cork, seal with grease |
Certain problems appear frequently enough that you should know how to diagnose them before seeking professional help. If your saxophone produces stuffy, muffled tones or certain notes won’t sound at all, suspect moisture trapped inside the body or a leaking pad. Try an extended drying session first—remove the neck and body, place them upright with the tone holes facing upward, and allow them to dry for 2-3 hours in a warm, dry location. This often resolves moisture-related issues.
If you hear a squeaking or whistling sound coming from the side keys or pinky keys, this usually indicates either moisture or old oil accumulation around the key pivots. Perform your weekly cleaning routine with fresh oil application to the pivot points. If the squeak persists after cleaning, you may have a bent spring or loose screw requiring professional attention. If your keys feel sluggish and don’t return quickly to their resting position, lubricate the pivot points with key oil and work each key repeatedly to distribute it. If this doesn’t improve response, a bent rod or weak spring is likely responsible.
When notes crack or produce an unstable tone, the cause is usually your embouchure or reed rather than the instrument itself. Try different reeds to isolate whether the problem follows a specific reed or is consistent across your reed rotation. If the problem persists with multiple reeds, have a trusted teacher or experienced saxophonist listen to confirm whether it’s an equipment or technique issue. If you’re confident the problem is equipment-related, suspect a leaking pad around the specific note’s tone hole or a bent key preventing proper pad closure.
Certain problems require professional attention and attempting DIY repairs can cause more damage. If you notice a bent key or bent rod in your key system, professional straightening or replacement is necessary. Attempting to bend these components back yourself will likely break them or throw off the delicate regulation. If your saxophone has visible dents directly over tone holes, a professional needs to assess whether the dent affects pad sealing or needs to be removed. If you hear air leaking from a pad that doesn’t improve with cleaning and pad oiling, the pad likely needs replacement or reseat
If your cork joint is cracked or severely compressed so that the neck won’t stay in place without constant adjustment, professional cork replacement is needed. If your springs are broken, bent beyond minor adjustment, or if multiple springs seem weak simultaneously, professional service is your solution. Don’t attempt to replace springs yourself—these are critical to the instrument’s function and improper installation will throw off all your key regulation.
Your saxophone’s pads are synthetic materials that seal the tone holes when you press the keys. These pads rest in cups and create an airtight seal. When you stop pressing a key, the pad lifts and allows air to pass through, opening that tone hole. Over time, pads compress, harden, and eventually stop sealing effectively. The timeline for this deterioration depends on moisture exposure, humidity levels, playing frequency, and the specific pad material.
Most modern saxophones use synthetic pads that last 1-3 years with heavy playing. If you play 2-3 hours daily, expect pads to need replacement after about 18-24 months. Lighter players using the same instrument for 30 minutes daily might have pads last 3-4 years. The signal that pads need replacement is usually gradual—you’ll notice that certain notes require more air pressure to speak clearly, or that low notes in particular start sounding stuffy and unclear. This indicates that pads are no longer sealing completely, allowing air to leak around them.
Pad care focuses primarily on moisture management. Moisture is what ages pads most rapidly. Always ensure your saxophone is thoroughly dried after playing, and maintain proper humidity levels in your storage area. Never use harsh cleaning products or alcohol on your pads—these degrade the synthetic material. If you accidentally get liquid on your pads, dry them immediately with a soft cloth and allow extended air-drying time. Avoid pressing keys down hard and holding them for extended periods during practice, as this puts excessive pressure on pads and accelerates deterioration.
Your saxophone’s exterior is typically finished with brass and protected by a lacquer coating. This finish is susceptible to corrosion from moisture, salt from skin contact, and the acids in your skin oils. Consistent care preserves both the appearance and the structural integrity of your instrument. After every playing session, wipe your saxophone with a soft microfiber cloth. This removes fingerprints, perspiration, and any moisture that could begin the corrosion process.
Once monthly, perform a more thorough polish using a specialized brass saxophone polish. These polishes are designed to remove light oxidation and tarnishing without damaging the underlying brass or the protective lacquer. Apply the polish sparingly to a soft cloth and rub gently in circular motions. Never use harsh scouring pads or abrasive materials—these scratch the lacquer and can permanently damage your instrument’s appearance. Focus on areas that show visible tarnishing or discoloration. Avoid getting polish inside tone holes or on pads, as it can affect their function.
For dents and scratches, accept them as part of playing a musical instrument. Minor cosmetic damage is inevitable and doesn’t affect your saxophone’s sound or function. Deep gouges that expose the bare brass underneath can allow corrosion to start, but these are rare from normal playing. If you have a significant dent directly over a tone hole that you suspect affects pad sealing or instrument response, that’s the time to visit a professional. Most professional repair specialists can remove small dents if the cosmetic issue bothers you enough to warrant the expense.
The most important aspect of saxophone care is consistency. Sporadic cleaning when you remember is far less effective than a regular routine performed the same way every time. Your goal should be to make saxophone maintenance as automatic as brushing your teeth—something you do without thinking, every single day. Begin by establishing your daily post-playing routine: remove moisture with your swab, wipe your mouthpiece, dry your reed, and allow your saxophone to air dry before reassembling and storing it.
Next, establish a weekly deep cleaning day—perhaps Sunday afternoon or Monday morning before your practice week begins. This becomes your dedicated time for the more thorough maintenance that takes 15-20 minutes. Schedule monthly inspections as well, perhaps on the first of each month, where you systematically check pads, springs, keys, and cork. As these routines become habits, you’ll find that they require minimal thought and actually protect your instrument from expensive repairs that result from neglect.
Perform weekly cleaning routine
Systematically check each pad for discoloration or sponginess
Test all keys for smooth operation and proper synchronization
Inspect all visible springs for bending or damage
Check cork joint for proper fit and any cracking
Examine mouthpiece interior for heavy buildup
Assess reed playability and appearance across your rotation
Verify humidity levels in your storage area
Replace desiccant packets if they appear saturated
You don’t need an extensive toolkit to properly maintain your saxophone. A well-chosen set of essentials will serve you for years. The foundation is a high-quality cleaning swab specifically designed for saxophones—typically made of absorbent material wrapped around a weighted cord. Avoid cheap swabs that shed fibers or are too heavy and risk getting stuck inside your instrument. A dedicated mouthpiece brush with soft bristles fits inside your mouthpiece’s chamber and removes stubborn buildup.
|
Supply |
Purpose |
Cost |
Lifespan |
|
Cleaning swab |
Daily moisture removal |
$15-25 |
3-5 years |
|
Mouthpiece brush |
Mouthpiece interior cleaning |
$8-12 |
2-3 years |
|
Soft microfiber cloth |
Exterior wiping |
$5-8 |
Indefinite |
|
Cork grease |
Lubricate cork joint |
$8-12 |
1-2 years |
|
Key oil |
Lubricate key pivots |
$10-15 |
2-3 years |
|
Reed case |
Store and protect reeds |
$15-30 |
Indefinite |
|
Hard protective case |
Transport and storage |
$150-400 |
10+ years |
|
Silica gel packets |
Control case humidity |
$10-15 |
Reusable, refresh monthly |
Invest in a cork grease and key oil formulated specifically for saxophones. These are slightly different from general-purpose lubricants and are designed to not accumulate or attract dust. Apply cork grease sparingly to the cork joint—more is not better. Key oil should be applied in tiny drops to the pivot points where each key rotates. A small bottle lasts years because you use so little at each application.
This depends on playing frequency and how well you maintain your reed rotation. Professional players using a single reed might replace it every 3-6 months, while casual players can use the same reed for a year. The better approach is maintaining a rotation of 5-7 good reeds, using a different one each day so all reeds get adequate rest. Replace any reed that darkens significantly, feels spongy, produces an uneven tone, or shows visible cracks or chipping.
Use a hard protective case, never a soft gig bag. Ensure your saxophone is completely disassembled inside the case with each component secured in its designated compartment. When arriving at a new location, especially one with different temperature or humidity than your home, don’t open your case for 30-45 minutes. Allow the instrument to gradually acclimate to the new environment. Bring silica gel packets to maintain stable humidity, and allow extra drying time after your first play session in a new location due to additional condensation from temperature adjustment.
No. Use only key oil formulated for woodwind instruments. Household oils, 3-in-1 oil, or general machine oil are too thick, accumulate too readily, and attract dust particles. This causes the exact problem you’re trying to prevent—sticky keys. Similarly, don’t use regular cork grease on your keys. Everything should be formulated specifically for musical instruments.
Muffled tone usually indicates moisture trapped inside the instrument or a leaking pad. First, perform extended drying: remove the neck and body and allow them to air dry upright for 2-3 hours. If this doesn’t resolve the issue, suspect a leaking pad or moisture inside the octave pip. Try playing only the middle register to determine if the problem is consistent across all registers or concentrated in specific areas. If a specific note sounds consistently muffled, the problem is likely a leaking pad near that tone hole. Have this professionally assessed and repaired.
Always disassemble your saxophone before storing it for more than an hour. When left assembled, the constant pressure of pads against tone holes causes them to lose their resilience and eventually stop sealing effectively. Additionally, trapped moisture can’t evaporate from between the body and neck joint. Store the neck upright or lying flat in its designated case compartment, and position the body so no keys experience pressure from resting on them.
Target 40-50% relative humidity for your storage area. Below 35% causes cork to dry out and become brittle, potentially cracking and allowing the neck to fit loosely. Above 60% promotes moisture absorption by pads and wood components, causing them to swell and interfering with proper key operation. Invest in an inexpensive humidity meter for your storage area so you can monitor conditions throughout the year and adjust with humidifiers or desiccants as needed.
With regular playing and good moisture management, synthetic pads usually last 1-3 years before needing replacement. Heavy players (3+ hours daily) might need pad replacement every 12-18 months, while recreational players can often use the same pads for 3-4 years. The indicator is functionality rather than a specific timeframe. When pads no longer seal effectively and notes start sounding stuffy, it’s time for professional pad replacement.
No. Attempting to straighten bent keys risks breaking them or throwing off the complex regulation of your key system. Even experienced repair technicians use specialized straightening tools to do this properly. If you notice a bent key, take your saxophone to a professional technician. Attempting DIY repairs almost always makes the problem worse and more expensive to eventually fix.
Immediately stop playing and perform a careful inspection. Check for visible dents, particularly over tone holes, and press all keys to see if they move smoothly or if anything feels bent or stuck. Play a few notes to listen for any unusual sounds or air leaks. Even if everything seems fine, have your saxophone professionally inspected. Internal damage might not be immediately obvious, and you want to catch any problems before they develop into expensive repairs. A fall can bend internal rods or springs that only a professional can properly assess.
Spring and fall are ideal times to prepare your saxophone for the coming season. In spring, as temperatures rise and humidity begins to increase, consider having your saxophone professionally serviced before summer. Check your humidity control system in your storage area and ensure desiccant packets are ready if you live in a humid climate. Clean your entire reed rotation and assess which reeds are worth keeping and which should be retired. This refresh before heavy playing season ensures your instrument is in peak condition.
As fall approaches and temperatures cool, adjust your storage environment again. This is the season when drying humidity becomes a problem as heating systems activate. Consider using a humidifier in your storage area to counteract artificially low humidity. Before winter begins, ensure your instrument is in excellent condition, as the combination of heating systems creating dry air and the stress of temperature fluctuations when moving between cold and warm environments makes winter particularly challenging for saxophone maintenance.
Winter requires particular vigilance. Never leave your saxophone in a cold car and expect to play it immediately upon entering a warm building. Condensation that forms on your instrument in these conditions causes extensive moisture damage. Always leave your saxophone in its closed case for 30-45 minutes after moving from cold to warm environments. During practice sessions in winter, pay extra attention to moisture removal. You may need to extend your post-playing drying time from 15 minutes to 30-45 minutes because the cold outdoor air condenses additional moisture on your instrument when you bring it indoors.
Consider keeping a simple log of your saxophone maintenance. Note the date you practice, the date you perform your weekly cleaning, when you change reeds, and when any professional service occurs. This log helps you identify patterns—for example, if you notice that you need to oil your keys more frequently during certain times of year, it might indicate that humidity in your storage area fluctuates seasonally. Over time, this record becomes invaluable for predicting when maintenance will be needed and for communicating with your professional repair technician about your instrument’s history.
Saxophone care is a journey of developing consistency, understanding, and attention to detail. The instrument rewards proper care with reliable performance, beautiful tone, and decades of musical satisfaction. The time you invest in daily cleaning, weekly deep maintenance, and monthly inspection is repaid many times over through avoided expensive repairs and the joy of playing an instrument that responds perfectly to your intentions. Whether you’re a beginning student just learning your first notes or a professional performing regularly, commit to these practices today, and your saxophone will remain a beautiful, responsive musical partner for years to come.
Music
Art
Dance
Yoga
Music
Voice
Theater
Dance
Art Classes
Music

Awarded as one of the best schools in Charlotte, NC

Exam preparation for Trinity College London and ABRSM

Music, Dance, and Art lessons all in one place

University-trained teachers with degrees only

Exclusive to our school: patented program School Of Little Talents

Preparation for future studies at Universities and Conservatories
Unlock the world of melody and creativity with a gift certificate redeemable for any music lesson, dance lesson, art lesson, or our exclusive program, School of Little Talents, for kids aged 4-7 at Virtuoso School of Music and Art. Delight your loved ones with the opportunity to explore their artistic passions under the guidance of our expert instructors
30 / 45 / 60 minutes
4 any music lessons
Piano, Voice, Violin.Viola, Cello, Drum, Guitar, Flute, Clarinet, Saxophone
60 minutes
4 any dance lessons
Ballet modern, Ballroom , Rhythmic Fusion, latin, Belly dance classes
60 minutes
4 any art lessons
Painting, Drawing ,Portrait
4 weeks
School of Little Talents program for kids of 4-7 ages only
Payment options available:
Credit Card
Apple Pay
Google Pay
How does the trial lesson work?
Your $25 trial gives you three lessons in one! You'll receive a private lesson on the instrument you're interested in, plus a free dance lesson and a free art lesson. It's the perfect way to explore multiple passions and find what truly inspires you—all at no additional cost.
How do I reschedule a lesson?
We know life can be unpredictable. If you need to reschedule, simply give us a call, send a text, or email us with advance notice. We’ll work with you to find a new time that fits your schedule—no hassle, no stress.
What programs do you offer?
In addition to private lessons on a wide range of instruments—including piano, voice, guitar, bass, ukulele, drums, violin, viola, cello, saxophone, clarinet, flute, and other wind and brass instruments—we also offer dance and art classes. Plus, we have our exclusive, patented "School of Little Talents" program for children ages 4 to 6, which combines four enriching activities in one. No matter what your child is passionate about, we have a program to inspire them.
Do I need to own an instrument to start?
Not right away! While we don’t offer instrument rentals, our studio is fully equipped with instruments that students can use during lessons. This allows you to begin learning right away. When you’re ready to practice at home, our specialists are happy to guide you in choosing the right instrument for your needs.
Are there discounts for enrolling in multiple programs?
We offer great savings when you purchase a package that includes multiple programs. Whether your family is combining music, dance, art, or our School of Little Talents, bundling allows you and your children to explore the arts together without stretching your budget. It's our way of making creative education more accessible for the whole family.
What if I have more than one child? Can they all take lessons at the same time?
Absolutely! We know how busy family life can be, which is why we've designed our programs with parents in mind. In addition to music, we also offer dance and art classes—plus our exclusive, patented "School of Little Talents" program for children ages 4–6, which combines four enriching activities in one. This means you can bring multiple children to the same location and have each one enrolled in a program that fits their age and interests. No more driving across town to different studios—everything your family needs is right here under one roof.
Didn't find the answer to your question?
Give us a call! We will be happy to answer all your questions.
School office:
School director:
Or write us an e-mail:
You can also get to know the school in person:
17232 Lancaster hwy. STE 108 Charlotte NC

Welcome to Virtuoso School of Music and Art, where excellence meets convenience! We take pride in offering our clients exceptional value and a unique experience that sets us apart from our competitors.
At Virtuoso School, we understand that your time is valuable. That’s why we provide a comprehensive range of lessons All in One Place. From Music lessons to Dance classes in various genres, Art classes, and our exclusive, patented program: SCHOOL OF LITTLE TALENTS for children aged 4-7, we offer a diverse selection of artistic disciplines. By choosing Virtuoso School, you can save time and effort by taking multiple lessons under the same roof
What truly distinguishes us is our commitment to professionalism. We believe in the importance of qualified instructors who hold relevant education and diplomas. That’s why at Virtuoso School, you can trust that you are learning from experienced professionals who are passionate about their craft. Our instructors bring their expertise and knowledge to each lesson, ensuring that you receive the highest quality instruction

Our School of Little Talents program is designed to ignite and nurture the artistic abilities of young children. With engaging activities and age-appropriate lessons, we provide a supportive environment for their creative growth. Our qualified instructors understand the unique needs of young learners and are dedicated to helping them develop their talents from an early age
ONLY University-Trained Teachers with Degrees
Specific curriculum
Piano, guitar, violin and other instrument classes
Dance and Art classes
Small Dance and Art classes sizes
Private and Group classes
Preparation for future studying at Universities and Conservatories
Exem Preparation – Trinity College London and ABRSM
Individual approach for every student
Patented Program: School of Little Talents
Semi-annual School Recitals
A variety of lessons and classes,All in one Place!
You will be taught by experienced, dedicated and, what is most important, patient tutors holding classes with enthusiasm and fun. You will find a great number of classes such as Music lessons, Dance classes, Art classes, unique program School of Little Talents, Music Theater, Preschool programand more others. You can book any classes you like easily according to your choice saving money and time! You will attend all year-round performances including class recital, semiannual school recitals, competitions, children’s festivals and other amusing events.
What is more, every single family gets a bonus upon registration – a Music Parent Handbook with all detailed information about our school programs!

Join us at Virtuoso School of Music and Art and experience the convenience of taking multiple lessons in one place, while receiving instruction from highly qualified professionals. Let us be your partner on your artistic journey, helping you unlock your full potential and discover the joy of self-expression.
Contact us today to learn more about our programs and start your artistic adventure with Virtuoso School.
Sign up